They are not completed yet...
What's left:
1)wires for the arms and feet
2)paint touch up here and there
3)filtering for the blue bands, I think the blue is too bright to my liking
4)more weathering
5)the heads, gotta bleach them and redo using Vallejo again, I suck at figure painting but I am going to try try again until I get them right!
6)the snowboard, still thinking whether to make it or not...
Tomorrow I will be on leave to take care of my kid again, hopefully can put complete some of these tasks.
Will
Showing posts with label Polar Bear. Show all posts
Showing posts with label Polar Bear. Show all posts
Tuesday, October 13, 2009

Monday, October 12, 2009
Polar Bear Trio and Daddy Falke pictures @PLAMO meet
Sorry for the lack of updates, I was really rushing to finish the models for Sunday's meetup. I fell asleep on Friday telling my kid a bedtime story, and on Saturday I did a little more white and blue bands.
I had a company outing Saturday evening and after it, I wass feeling unwell. Slept until 2 am Sunday morning, and then restarted work on the decals and weathering. Who would expect decal placement to take 2.5hours? After that I rushed to paint the faces (and failed cos first time using Vellejo paint). Enamel panel washing completed. Base did not have time to do.
Anyway here are the photos taken by viper1972 of www.spruecutters.com. Thanks man for the fantastic photos and tips on photo taking!
(Note to self: I will still need to work on these, as they are only about 85% complete)


I had a company outing Saturday evening and after it, I wass feeling unwell. Slept until 2 am Sunday morning, and then restarted work on the decals and weathering. Who would expect decal placement to take 2.5hours? After that I rushed to paint the faces (and failed cos first time using Vellejo paint). Enamel panel washing completed. Base did not have time to do.
Anyway here are the photos taken by viper1972 of www.spruecutters.com. Thanks man for the fantastic photos and tips on photo taking!
(Note to self: I will still need to work on these, as they are only about 85% complete)


Thursday, October 8, 2009
Polar Bear WIP 14
This is how it looks like after 4-5 coats of white + highlighting... I am almost there...


A bit more white + highlights and I will do the blue camo bands... So sleepy...


A bit more white + highlights and I will do the blue camo bands... So sleepy...
Polar Bear WIP 14
After the second/third coat of white...
the two handed PB

 Oops, a bit of the plastic showing, time to add back the brown and patch it with white...
the hardboiled PB


My brushes used for the PB
 I used a loaded tiny brush then clean up the areas where the paint pools up with another brush...
Take an internet break before I carry on... :)
Polar Bear WIP 13
First coat of white + a bit of yellow... with lotsa Gunze thinner and retarder...
Took a deep breath and dap all over the kits..


I know it looks like crap right now... but its just the first layer of white!
I love this part of the painting, where I dap and touch the surface and let the colors mix.
Takes a bit of faith, knowing the final result should look like this...

Expect multiple updates tonight!
This is really relaxing man... :)
Took a deep breath and dap all over the kits..


I know it looks like crap right now... but its just the first layer of white!
I love this part of the painting, where I dap and touch the surface and let the colors mix.
Takes a bit of faith, knowing the final result should look like this...

Expect multiple updates tonight!
This is really relaxing man... :)
Wednesday, October 7, 2009
Polar Bear WIP 12 Painting started
 Started painting finally... Using dark earth, mahogany and black, I hand brushed the polar bears...Looks like a mess right now, hopefully the next stage of white will make it look better...
Wednesday, September 30, 2009
Polar Bear WIP 10, PB unite!
Thanks guys, not much modeling done until tonight...
I added the power cable to the main laser arm, added welds to each upper arm (bit hard to see) and with extra bondite, added a bulge to the laser. Also drilled and added a periscope on the top bulge.

Thanks to Agent L for the AFS Night Stalker, I fixed up the left manipulator to my second PB.
Found a perfect part for the missile, the end of a pen (seen in the picture)

I plan to attach/hand a snow board to the PB, roughly this size... What do you guys think?

Again, the final layout of the trio...

I hope to finish this for the Oct 11 PLAMO meet, together with the Falke... :)
I added the power cable to the main laser arm, added welds to each upper arm (bit hard to see) and with extra bondite, added a bulge to the laser. Also drilled and added a periscope on the top bulge.

Thanks to Agent L for the AFS Night Stalker, I fixed up the left manipulator to my second PB.
Found a perfect part for the missile, the end of a pen (seen in the picture)

I plan to attach/hand a snow board to the PB, roughly this size... What do you guys think?

Again, the final layout of the trio...

I hope to finish this for the Oct 11 PLAMO meet, together with the Falke... :)
Tuesday, September 8, 2009
Polar Bear WIP 9 & Falke WIP 1
I know I know, its been a while since I updated my WIP. But I have not been lazy (real lazy anyways). :)

I've sanded down all the seamlines and rough patches on the Hard boiled Polar Bear and also started gluing and sanding the Falke.
 Now don't let the low number of parts cheat you, many of them need sanding and the hardest part for me was to glue the two halves together. I did it the way taught by viper1972 in one of the PLAMO videos, using the Tamiya extra thin cement to glue it bit by bit, all the while trying to align the joints... Thanks viper!
 I also had problems with the front part of the cockpit, you can see the bondite I used to putty up the joints. I had to sand and sand and also use sandpaper with tweezer to sand the sides of the cockpit... Now to prime it!

I've sanded down all the seamlines and rough patches on the Hard boiled Polar Bear and also started gluing and sanding the Falke.
 Now don't let the low number of parts cheat you, many of them need sanding and the hardest part for me was to glue the two halves together. I did it the way taught by viper1972 in one of the PLAMO videos, using the Tamiya extra thin cement to glue it bit by bit, all the while trying to align the joints... Thanks viper!
 I also had problems with the front part of the cockpit, you can see the bondite I used to putty up the joints. I had to sand and sand and also use sandpaper with tweezer to sand the sides of the cockpit... Now to prime it!
Friday, August 7, 2009
Polar Bear WIP 8 - Hardboiled PB sculpting completed
A little update:
Did the joint covers for the rest of the arms...
I was a bit lazy and just puttied over the manipulator arm's original rubbery joint cover.
Also added a periscope bump on the top of the Hardboiled PB


Did the joint covers for the rest of the arms...
I was a bit lazy and just puttied over the manipulator arm's original rubbery joint cover.
Also added a periscope bump on the top of the Hardboiled PB

Left view

Rear view

Thursday, August 6, 2009
Polar Bear WIP 8 - Hardboiled PB sculpting
Ok tonight I've gotten some 2-3 hours of solid work on this ...
Drilled tiny holes in the laser arm for where the wires go, and sculpted one joint cover
(I was quite afraid of doing this as its my first time)
Here's one joint cover completed with bondite.

Then I worked on making the fist closed.
A bit bolder now, I just used the cutter to cut the joints 90%, bent them and added lots of cement.
Once dried, I added bondite to cover the gaps.

Still a little rough (the tiny bondite finger covers) but I will work on them more when it cures.

That's all for tonight.
:)
Drilled tiny holes in the laser arm for where the wires go, and sculpted one joint cover
(I was quite afraid of doing this as its my first time)
Here's one joint cover completed with bondite.
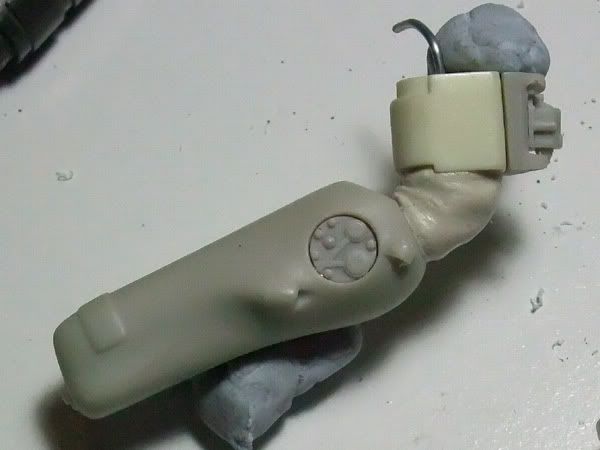
Then I worked on making the fist closed.
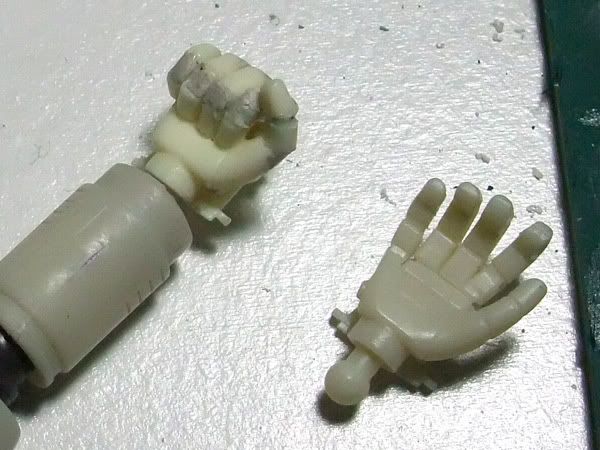
A bit bolder now, I just used the cutter to cut the joints 90%, bent them and added lots of cement.
Once dried, I added bondite to cover the gaps.
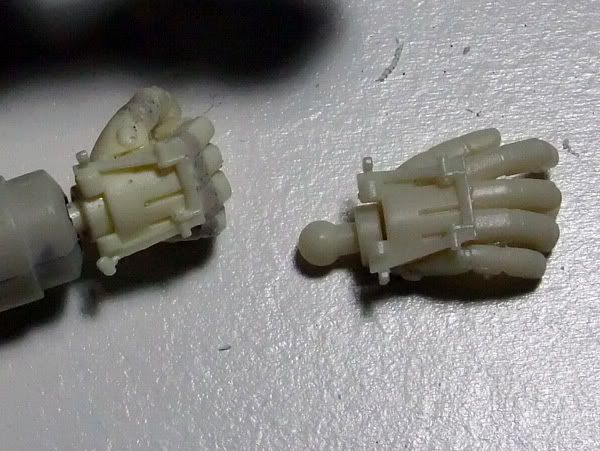
Still a little rough (the tiny bondite finger covers) but I will work on them more when it cures.
That's all for tonight.
:)
Tuesday, August 4, 2009
Polar Bear WIP 7 + 2 more PB!!!
Finally back at this build, gotten my 2 more PB thru leafster my bro, and started on the fantastic resin kit (my first) from Francesco...
Here's my game plan, the 3 Polar Bears are going hunting for Konigs Krote. The trio is inspired by the Ma.K Falke Profile book. I plan to call this diorama "Going Hunting". Que the music video "hunter" here which is one of my favourite music videos!
The Hardboiled PB will be in the front, stopping the group as he spots a KK footpprint in the snow.

The second PB will be carrying rocket(s), I am still waiting the the other hand (will be using the night-fighting variant's left hand).
 The last PB will be my first completed PB. (I just realised that I glued the crotch armor to the rear, and the buttplate in front on the completed PB, but oh well, looks ok)
 View from the left
I am totally in love with snow!
Comments/Criticisms encouraged...
Incidentally...
 lol (this is not in the scene)
Here's my game plan, the 3 Polar Bears are going hunting for Konigs Krote. The trio is inspired by the Ma.K Falke Profile book. I plan to call this diorama "Going Hunting". Que the music video "hunter" here which is one of my favourite music videos!
The Hardboiled PB will be in the front, stopping the group as he spots a KK footpprint in the snow.
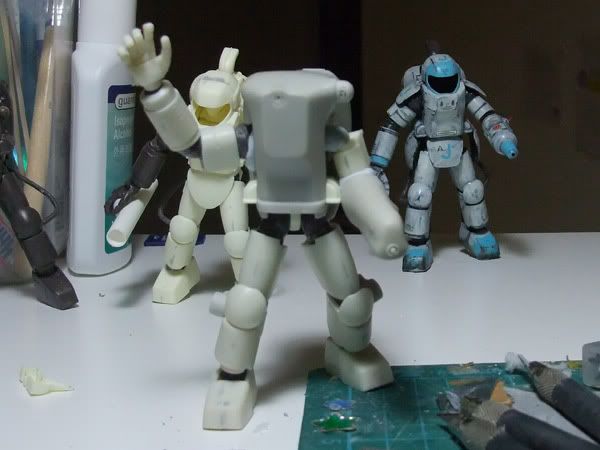
The second PB will be carrying rocket(s), I am still waiting the the other hand (will be using the night-fighting variant's left hand).
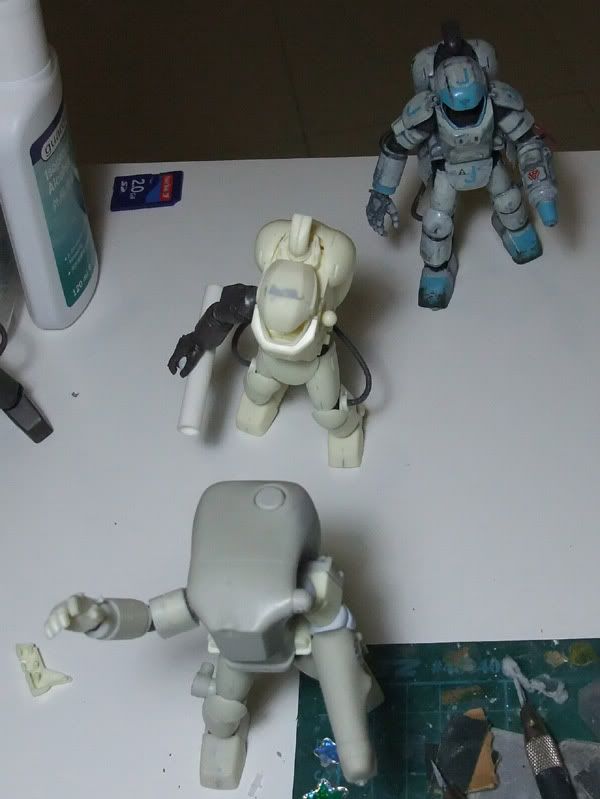 The last PB will be my first completed PB. (I just realised that I glued the crotch armor to the rear, and the buttplate in front on the completed PB, but oh well, looks ok)
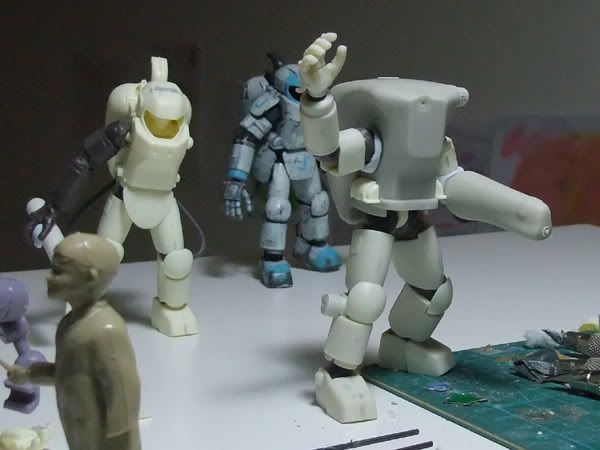 View from the left
I will be scratch building skis, snowboard and rockets for the scene.
Comments/Criticisms encouraged...
Incidentally...
 lol (this is not in the scene)
Friday, May 15, 2009
Polar Bear WIP 6
Polar Bear WIP 6
Hope you guys are not tired by the constant updates! Today I managed to sneak in some time in the Polar Bear. I added a bit of white highlights on the backpack and laser arm, looking at the instruction booklet's image of the Polar Bear. The image showed the top portion of the back pack as very white, which is nice...
 I added a decal on the blue stripe located on the helmet. Then I used a pin vise, a sharp blade and needle file to drill out some holes for the wires.
 I used normal electrical wires for the legs, which are a bit thick but they are the thinnest I could find. Not as thin and flexible as the ones provided in the old Nitto boxes. I figured the legs needed slightly thicker wires for the power it needed.
 For the arms, the black wires came from my spare Fireball box and the red, thicker one is an electrical wire. I super glued the wires to the laser arm and tuck the other end into the upper arm. Oops, one wire came out!
 I also used black/brown Gunze and touched up the joint covers, and dry brushed a little bit on the feet and backpack... Not very happy with the feet though. Any suggestions?
Polar Bear WIP 5
Polar Bear WIP 5
I added 2 kill marks (red PKA H0 kill marks) on one side of the backpack. I demonstrated how to apply decal to my disciple Ashley Chin (my inquisitive kid) and my father in law who is staying with us over the weekend.

I started applying the blue stripes using a mixture of RLM65 No 115 light blue, No 64 sky blue and No 1 white on the forearms, helmet, and feet. I took care to just add thin coats of the mixture and left some parts unpainted to simulate chips.

Ashley is very interested and painting robot and almost did not want to sleep when my in laws asked her to sleep with them! :)

Seeing the J markings and the Polar Bear logo being too dark, I decided to jump in and paint the decals. I was afraid that the thinner would dissolve the decal because I had a disaster using Tamiya enamel thinner on top of unprotected decals. Unlike the enamel thinner, the Gunze thinner did not dissolve/melt the decal, but it was very tough trying to paint within the decals. The end result was not fantastic. Oh well, try again next time.
Now to find my tools and wires to do some modding...
I added 2 kill marks (red PKA H0 kill marks) on one side of the backpack. I demonstrated how to apply decal to my disciple Ashley Chin (my inquisitive kid) and my father in law who is staying with us over the weekend.

I started applying the blue stripes using a mixture of RLM65 No 115 light blue, No 64 sky blue and No 1 white on the forearms, helmet, and feet. I took care to just add thin coats of the mixture and left some parts unpainted to simulate chips.

Ashley is very interested and painting robot and almost did not want to sleep when my in laws asked her to sleep with them! :)

Seeing the J markings and the Polar Bear logo being too dark, I decided to jump in and paint the decals. I was afraid that the thinner would dissolve the decal because I had a disaster using Tamiya enamel thinner on top of unprotected decals. Unlike the enamel thinner, the Gunze thinner did not dissolve/melt the decal, but it was very tough trying to paint within the decals. The end result was not fantastic. Oh well, try again next time.
Now to find my tools and wires to do some modding...
Thursday, May 14, 2009
Polar Bear WIP 4
Polar Bear WIP 4
As suggested by Lin.K, I placed the arms and parts together and realized that they are too dark when compared with the suit. So I went to whiten the areas even more, with lacquer paint. I hesitated using acrylics as I don't handbrush well with them, and will try to 'highlight' a bit later with enamels after a coat of protective layer. Here's how it looks with the second layer of white. As you can see, some of the contrasting strokes are covered up. Can't say its better or worse than before.
 I scrubbed the feet a bit to reveal the bottom coat and to have some variation in the paint job.
Decided that its gloss enough and before I add the blue stripes, I applied the decals so that I have a sense of how large the blue stripes should I paint later, and also I will attempt to use the blue to repaint over some of the decals. First time doing this so I am a bit fearful.
 Here's how it looks like after adding decals. I used the 'J' option, as I wanted to make the fellow in the Ma.K BD as well as in the Ma.K Profile #1 - Falke book. Don't know his name, but I like him, and so I used the decals as instructed by the instruction booklet religiously. Not too much decals eh?
 I applied Mark Setter on the place where I am going to put the decal, slide it off and position it with a cotton bud. Once dried, I applied Mark Softener on it. After that has dried, I repeat the process with Mark Softener again.
I am still thinking of whether to use some of kill marking decals...
 That's it for tonight, hopefully tomorrow I can do the blue stripes, and add wires to the kit.
Night guys! (or is it morning -_-''')
Subscribe to:
Posts (Atom)
